はじめに
MacのLow Level Graphics APIのMetalをC++で開発したい。
MetalはObjective-CもしくはSwiftでしか使用することができない。
MetalをC++でも使用できる様にするためのラッパークラスがGitHubにあるので、それを利用してC++の環境でMetalで開発してみる。
動作環境
macOS Venture 13.2
Xcode 14.2
macOS Big Sur 11.1
Xcode 12.3
サンプルコード
ここでのソース等は以下のGitHubで公開している。
github.com
セットアップ
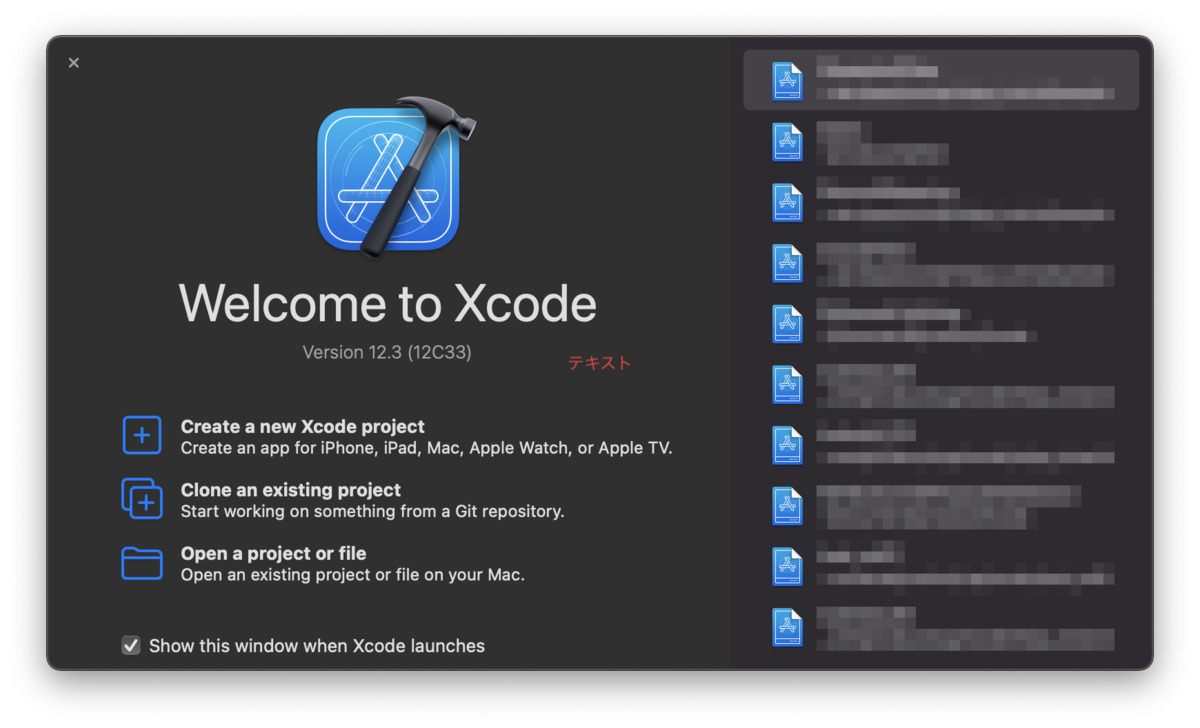
空のプロジェクトの作成方法
Xcodeを起動して起動画面の "Create a new Xcode project" を選択する。
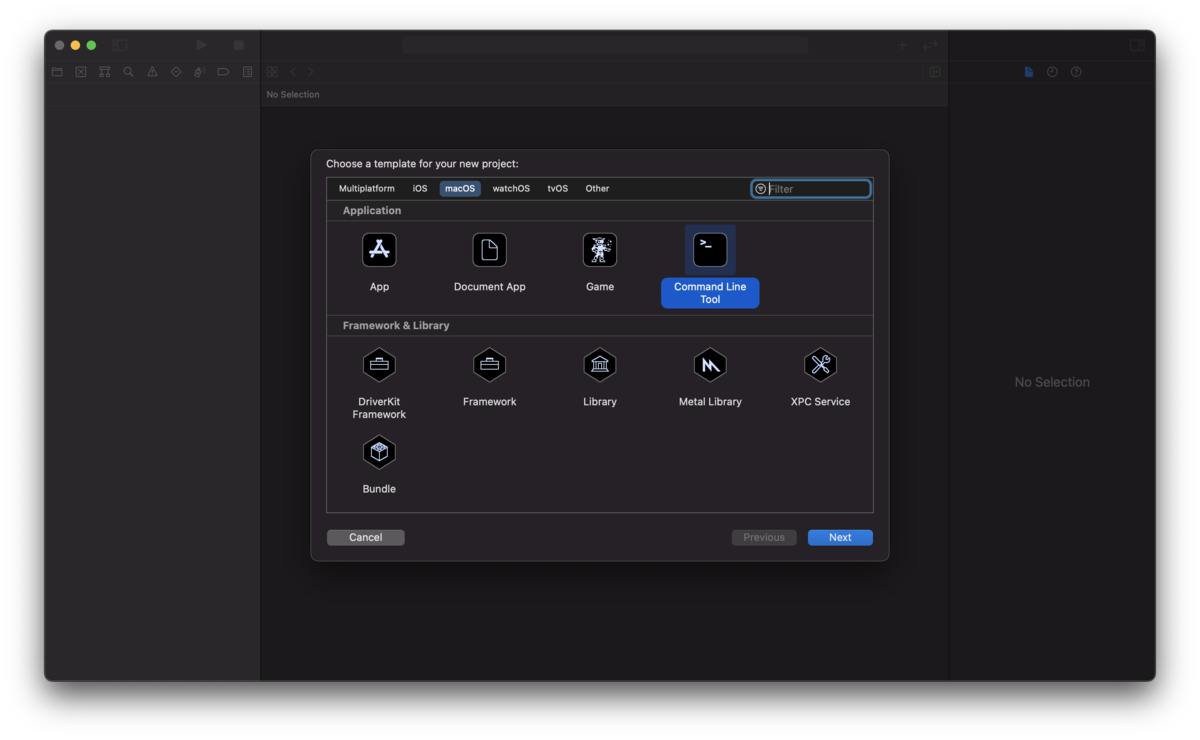
プロジェクトのテンプレートの選択で "Application" の "Command Line Tool" を選択する。
オプションの選択でプロジェクト名を入力。
言語はC++を選択。
TeamやOrganization Identifer等は適宜設定。
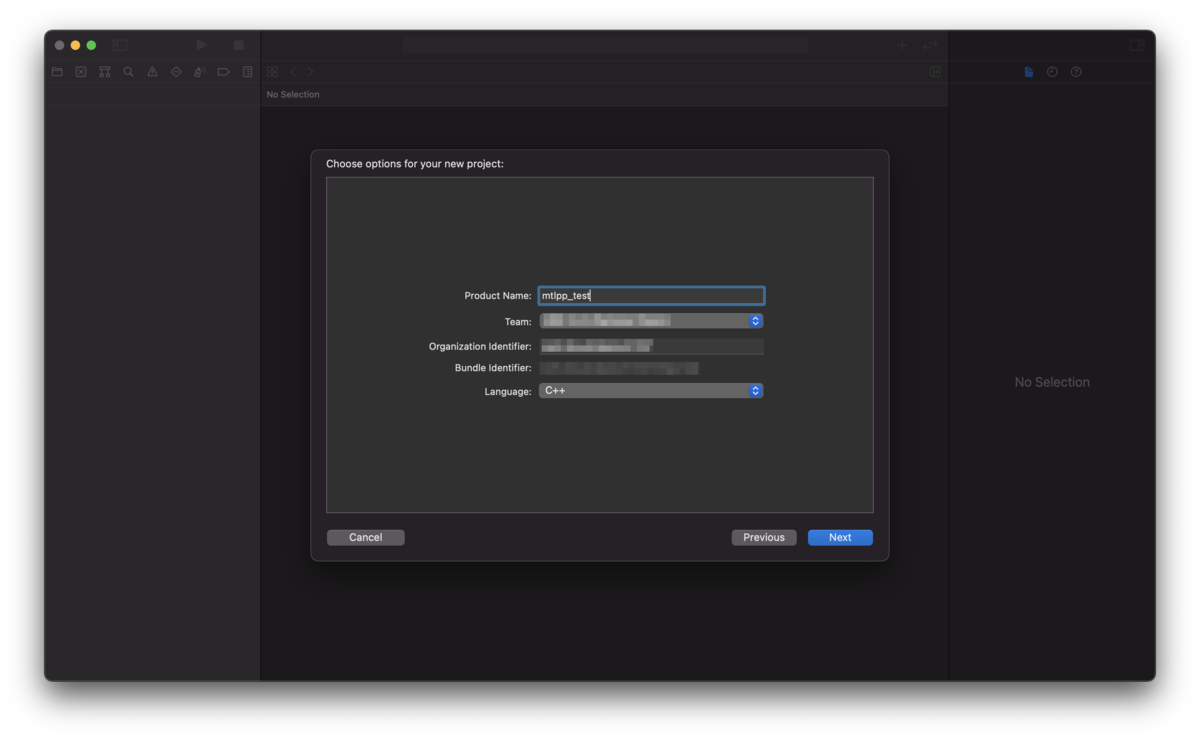
プロジェクトを保存するフォルダを選択して作成。
空のプロジェクトが作成される。
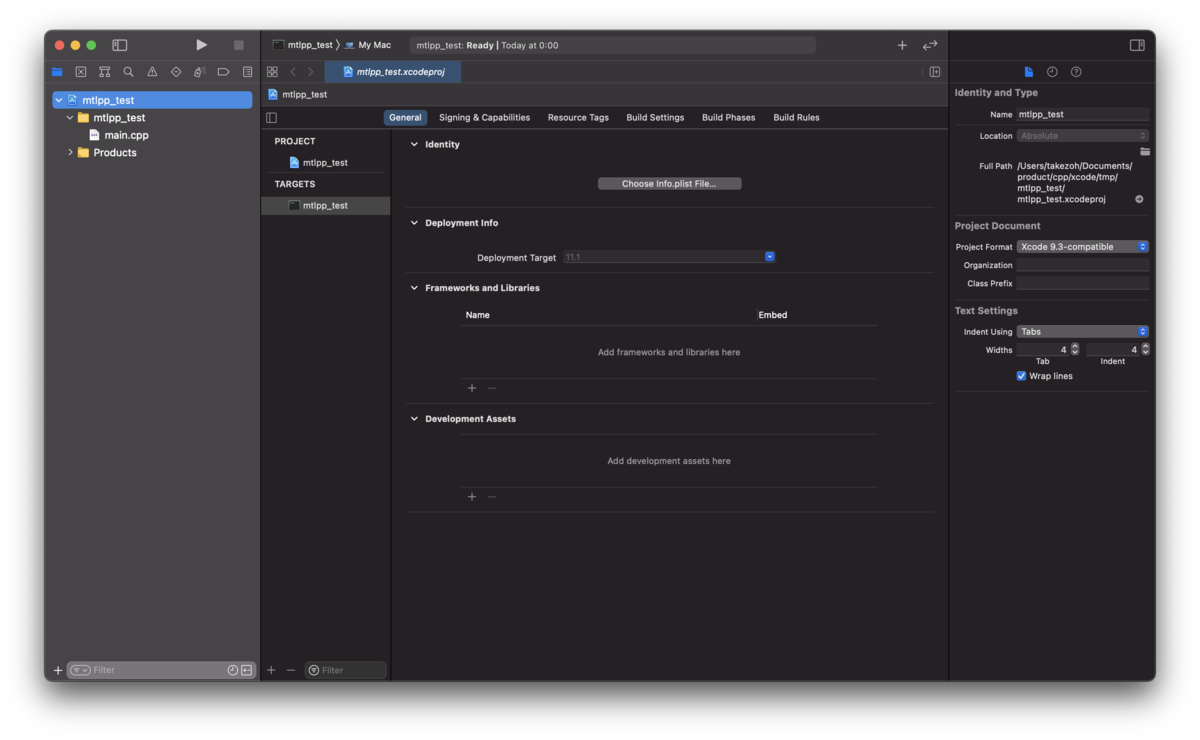
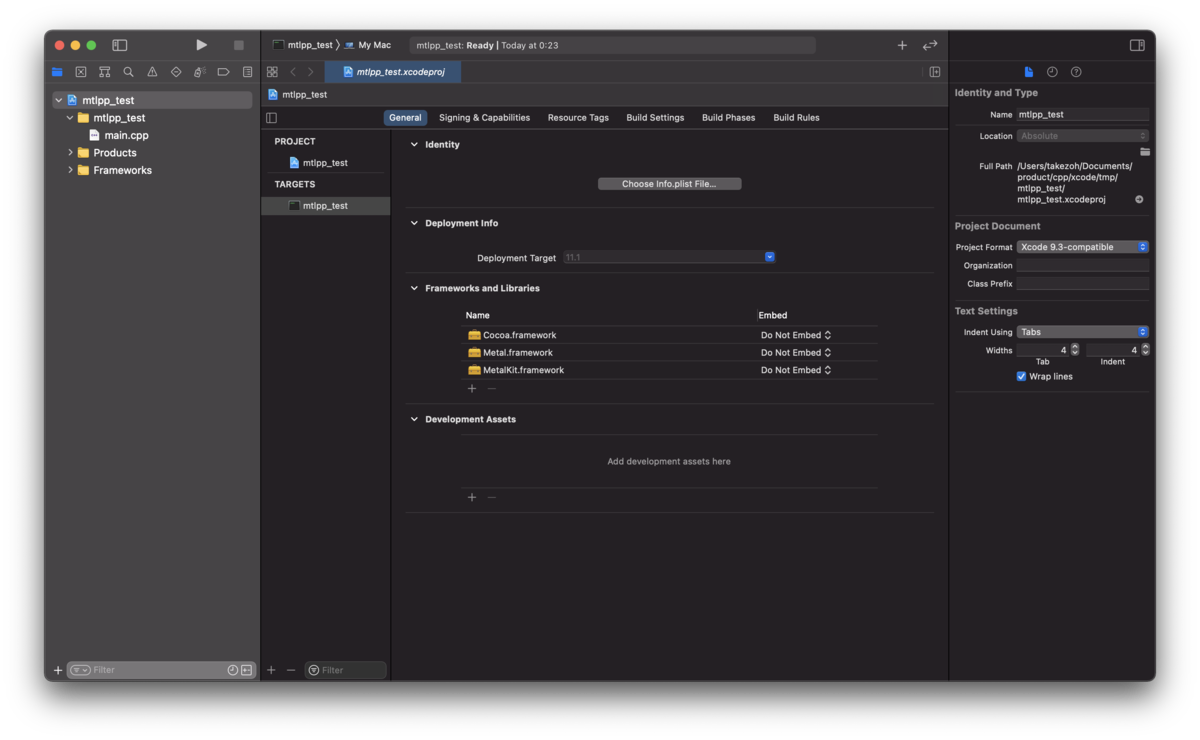
TARGETSの[General]もしくは[Build Phases]のタブを選択。
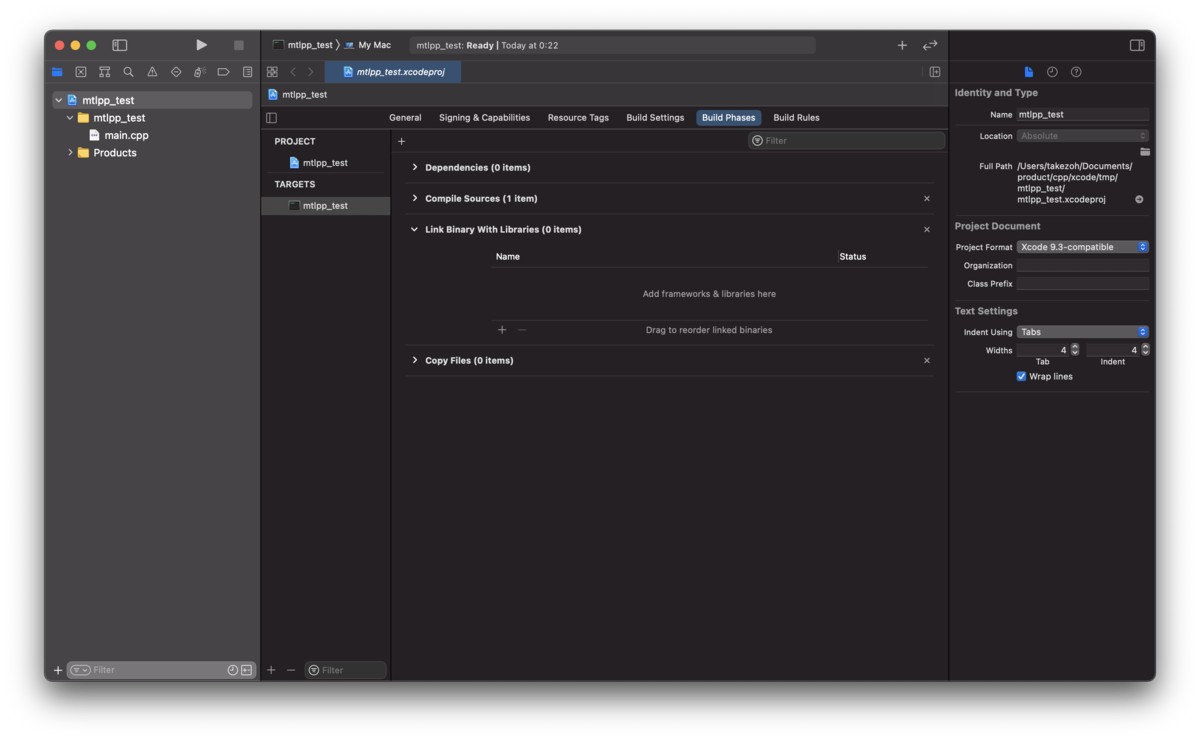
その中の[General]の場合は Framework and Libraries、[Build Phases]の場合は Link Binary With Libraries の項目に以下のフレームワークを追加する。
Cocoa.framework
Metal.framework
MetalKit.framework

mtlppをプロジェクトに追加
GitHubのmtlppからソースをクローン、もしくはダウンロードしてくる。
github.com
ダウンロードして解凍すると以下様なファイルがある。
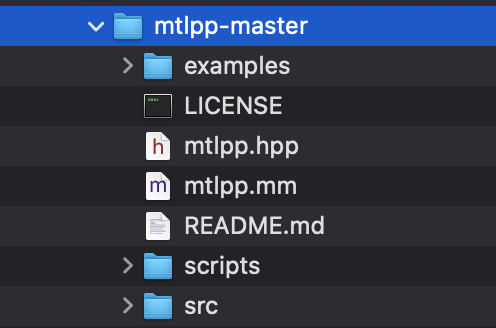
元のソースはsrc以下にあるが、ビルドするとmtlpp.hpp、mtlpp.mmというファイルにまとめられる。
まとめられたファイルも含まれているのでこのファイルを使用する。
www.main-function.com
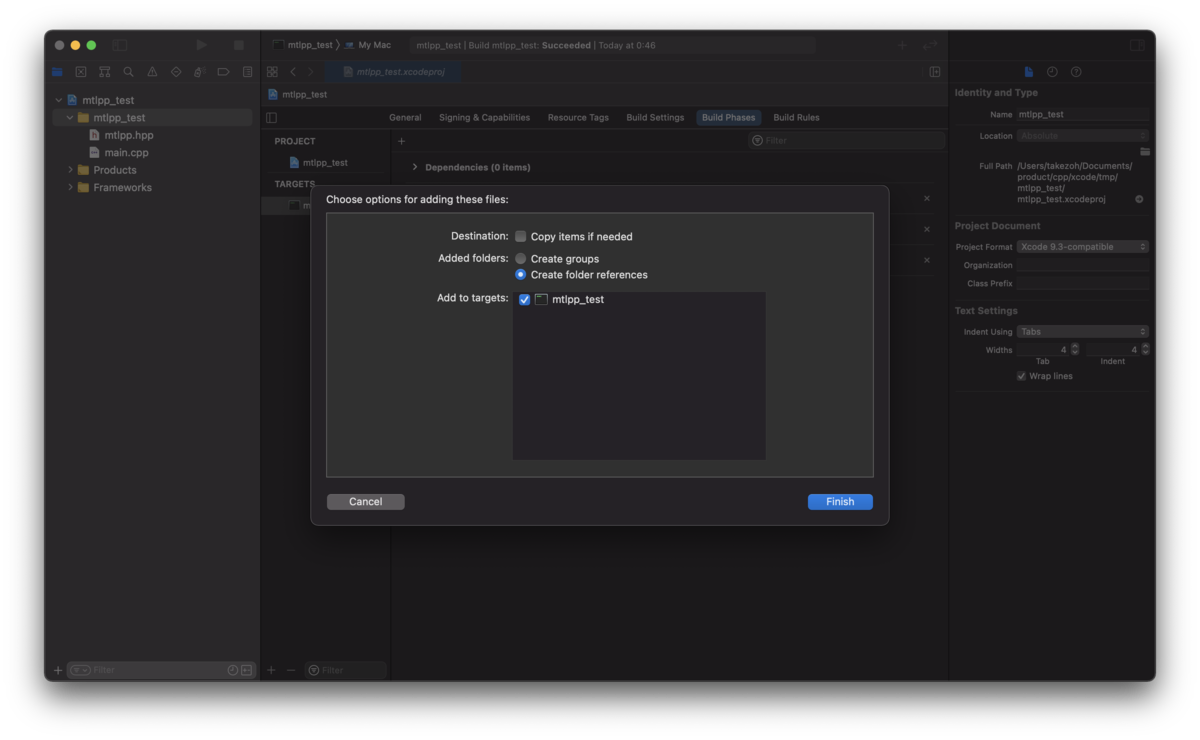
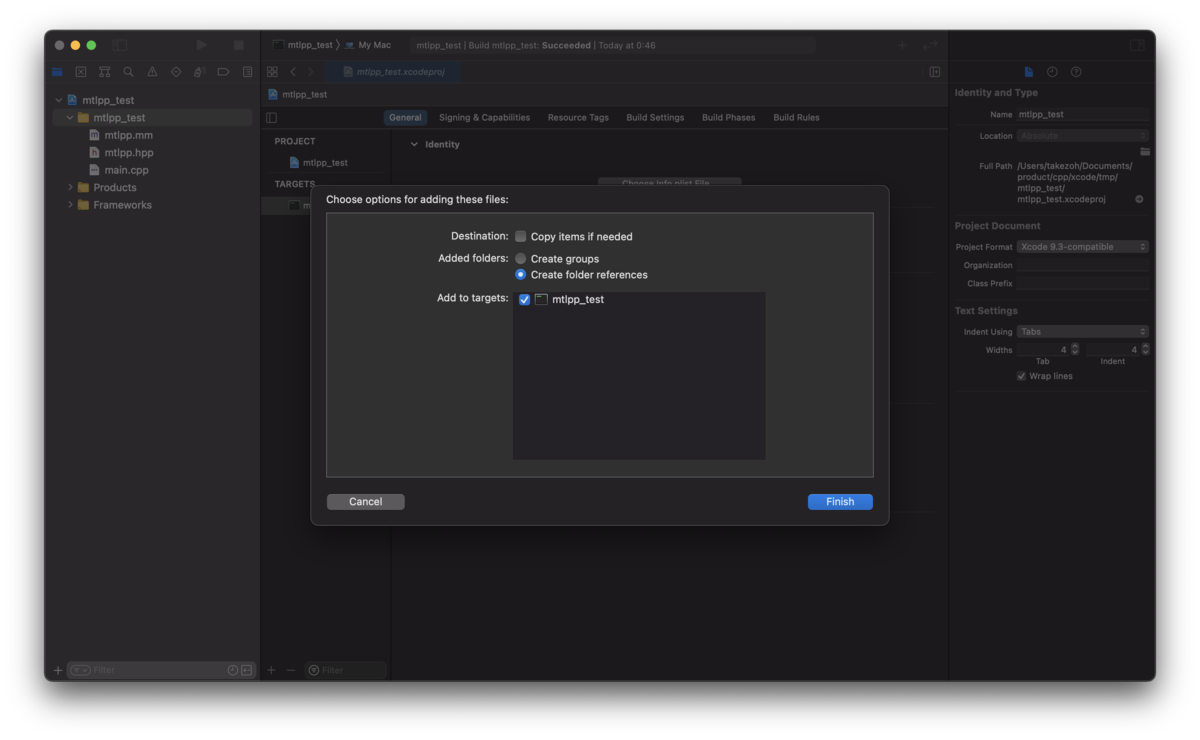
mtlppのmtlpp.hppとmtlpp.mmをプロジェクトに追加する。
同様にmtlppのサンプルプログラムに含まれているwindow.hppとwindow.mmもそのままプロジェクトに追加する。
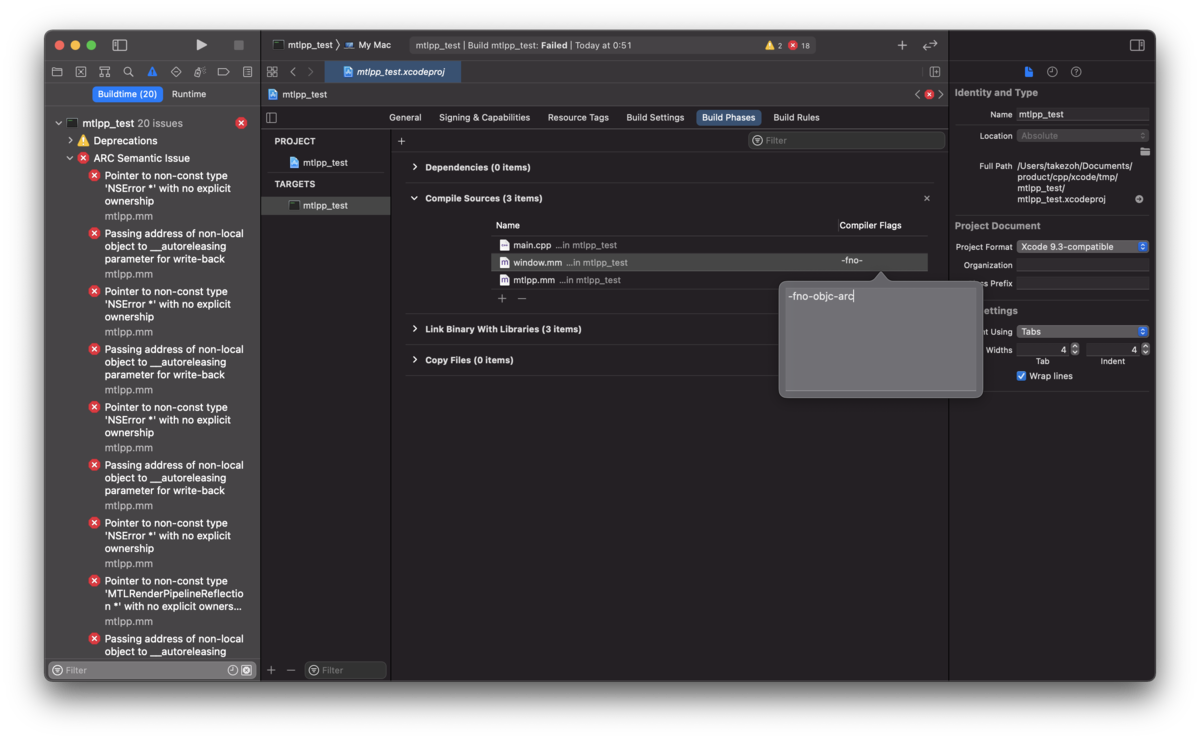
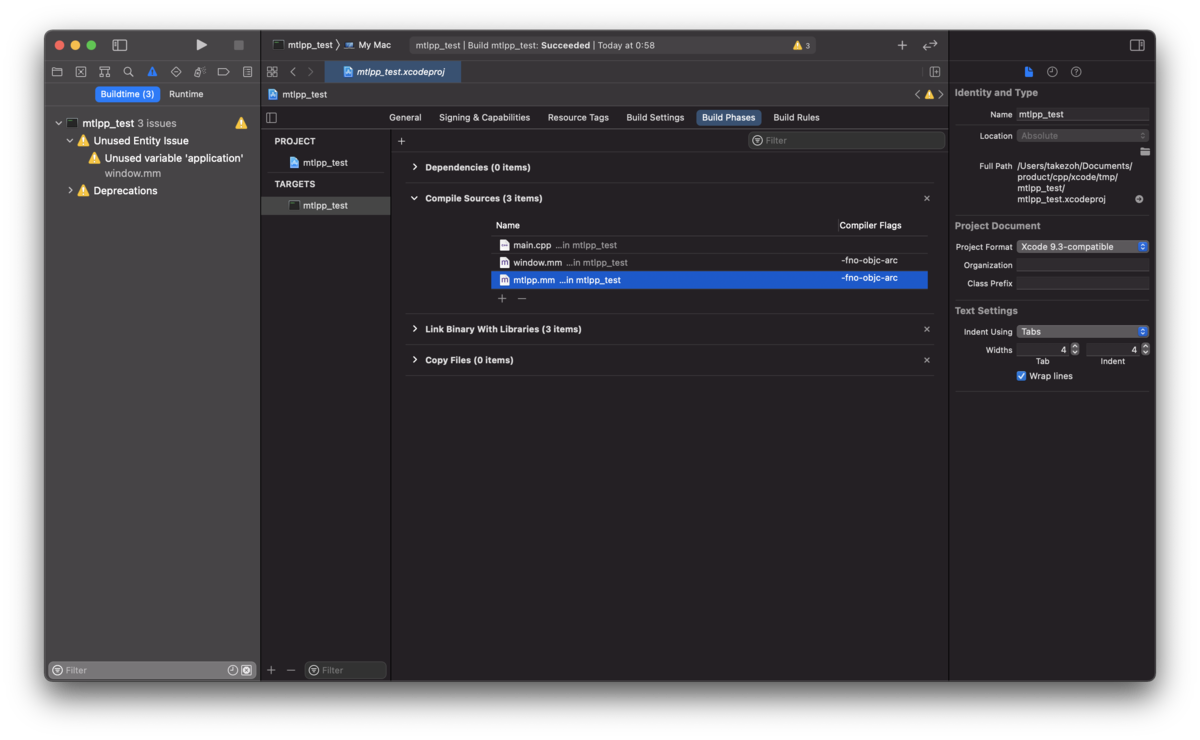
ARCの設定
mtlppはARC非対応となっているためにそのままビルドするとビルドエラーになってしまう。
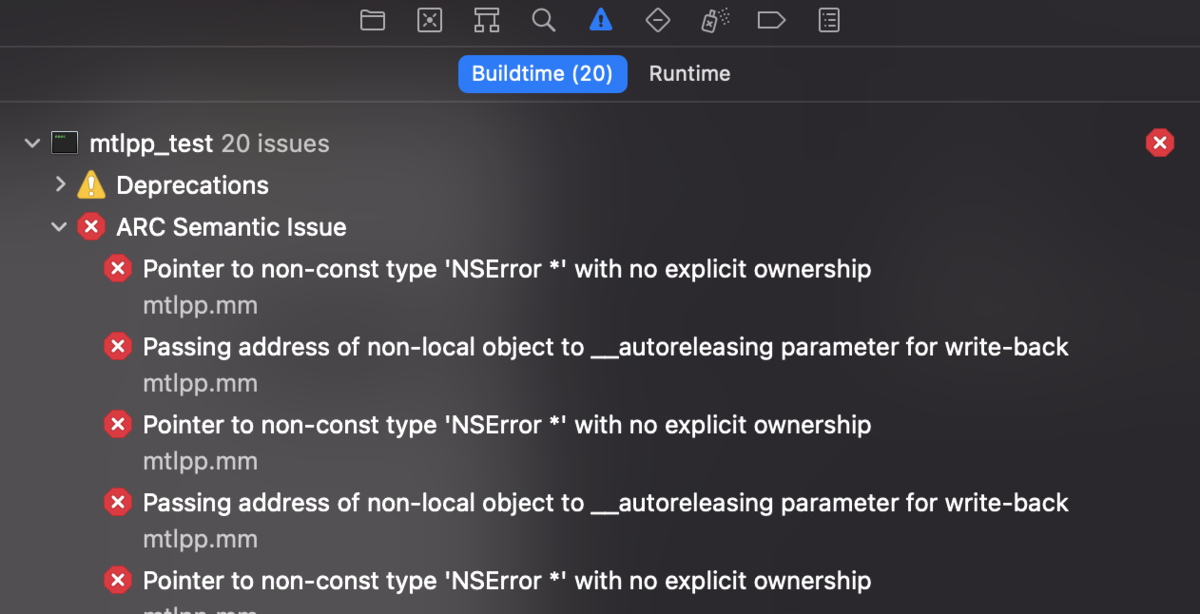
[Build Phases]の Compile Sources のCompiler Flagsに以下のオプションを追加する。
-fno-objc-arc
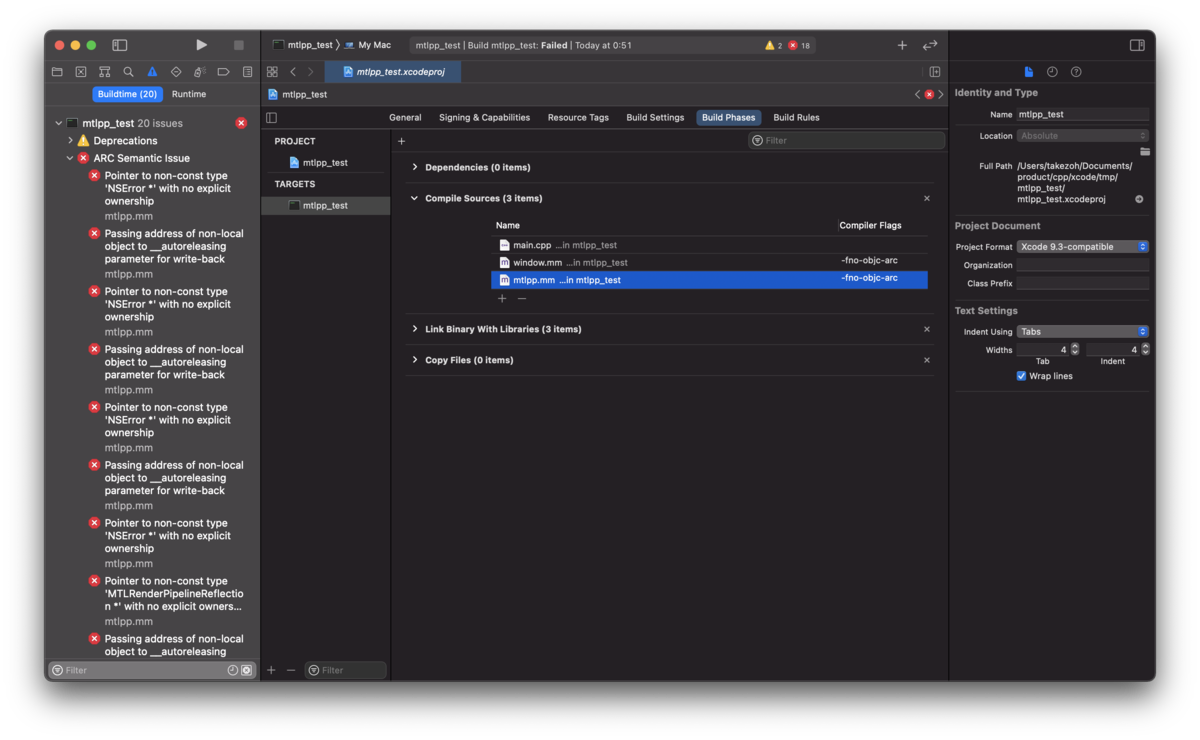
ビルドするとエラーが解消される。
ウィンドウの表示
#include "mtlpp.hpp"
#include "window.hpp"
mtlpp::Device g_device;
void Render(const Window& window)
{
}
int main(int argc, const char * argv[])
{
g_device = mtlpp::Device::CreateSystemDefaultDevice();
assert(g_device);
Window window(g_device, &Render, 320, 240);
Window::Run();
return 0;
}
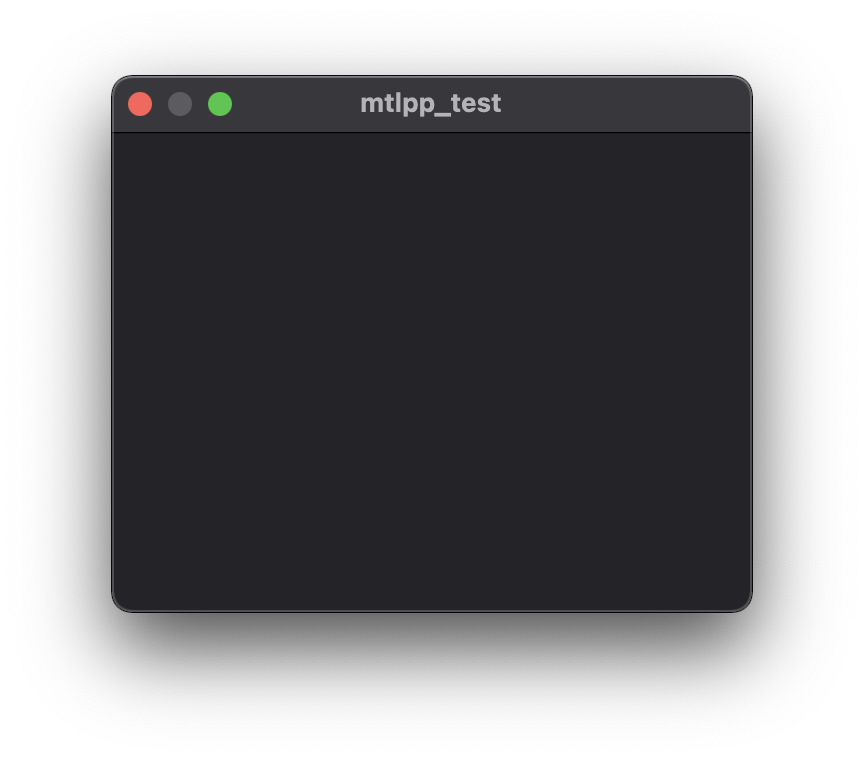
空のウィンドウが表示されることを確認。
Metalのデバイスの生成にはmtlpp::Device::CreateSystemDefaultDevice()を使用して生成する。
mtlppのサンプルプログラムにあるWindowクラスでウィンドウを生成することができる。
コンストラクタには生成したMetalのデバイスとフレーム毎に呼ばれるコールバック関数、画面サイズを指定指定生成。
Window::Run()で実行され、コールバック関数が呼ばれる様になる。
三角形の描画
コマンドキューの生成
コマンドバッファの実行順を管理するためのキュー。
基本的にはアプリで一つ生成しておく。
g_commandQueue = g_device.NewCommandQueue();
assert(g_commandQueue);
シェーダーの初期化
シェーダーファイル(.metal)ではなく直接ソースにシェーダーを記述してみる。
デバイス生成後にシェーダーの初期化を行う。
const char shaderSrc[] = R"""(
#include <metal_stdlib>
using namespace metal;
// 頂点シェーダー.
vertex float4 vertFunc(const device packed_float3* vertexArray [[buffer(0)]], unsigned int vID [[vertex_id]])
{
return float4(vertexArray[vID], 1.0);
}
// フラグメントシェーダー.
fragment half4 fragFunc()
{
return half4(1.0, 0.0, 0.0, 1.0);
}
)""";
mtlpp::Library library = g_device.NewLibrary(shaderSrc, mtlpp::CompileOptions(), nullptr);
assert(library);
mtlpp::Function vertFunc = library.NewFunction("vertFunc");
assert(vertFunc.GetPtr());
mtlpp::Function fragFunc = library.NewFunction("fragFunc");
assert(fragFunc.GetPtr());
MSLについては後で説明。
www.main-function.com
とりあえず受け取った頂点バッファをそのままフラグメントシェーダーに渡す頂点シェーダーと、赤のみを出力するフラグメントシェーダーを用意。
mtlp::DeviceのNewLibrary()でシェーダーを記述した文字列を渡すことでシェーダーを扱うmtlpp::Libraryのインスタンスを生成。
NewFunction()で頂点シェーダー、フラグメントシェーダーそれぞれの関数を取得。
頂点バッファの生成
{
const float vertexData[] =
{
0.0f, 1.0f, 0.0f,
-1.0f, -1.0f, 0.0f,
1.0f, -1.0f, 0.0f,
};
g_vertexBuffer = g_device.NewBuffer(vertexData, sizeof(vertexData), mtlpp::ResourceOptions::CpuCacheModeDefaultCache);
assert(g_vertexBuffer.GetPtr());
}
今回は座標のみ。
スクリーン座標は中心が(0.0,0.0)で上下左右にそれぞれ-1.0〜1.0の範囲なのでそれぞれの頂点は以下の様になる。
0.0f, 1.0f, 0.0f,   // 上の座標.
-1.0f, -1.0f, 0.0f, // 左下の座標.
1.0f, 1.0f, 0.0f,   // 右下の座標.
mtlpp::DeviceのNewBuffer()で頂点バッファとして生成。
レンダーパイプラインの生成
{
mtlpp::RenderPipelineDescriptor desc;
desc.SetVertexFunction(vertFunc);
desc.SetFragmentFunction(fragFunc);
auto attach = desc.GetColorAttachments();
attach[0].SetPixelFormat(mtlpp::PixelFormat::BGRA8Unorm);
g_renderPipelineState = g_device.NewRenderPipelineState(desc, nullptr);
assert(g_renderPipelineState.GetPtr());
}
void Render(const Window& window)
{
    mtlpp::CommandBuffer commandBuffer = g_commandQueue.CommandBuffer();
    assert(commandBuffer.GetPtr());

    mtlpp::RenderPassDescriptor renderPassDesc = window.GetRenderPassDescriptor();

    if(renderPassDesc)
    {
        mtlpp::RenderCommandEncoder encoder = commandBuffer.RenderCommandEncoder(renderPassDesc);
        assert(encoder.GetPtr());

        encoder.SetRenderPipelineState(g_renderPipelineState);
        encoder.SetVertexBuffer(g_vertexBuffer, 0, 0);
        encoder.Draw(mtlpp::PrimitiveType::Triangle, 0, 3);
        encoder.EndEncoding();

        commandBuffer.Present(window.GetDrawable());
    }

    commandBuffer.Commit();
    commandBuffer.WaitUntilCompleted();
}
コマンドキューからコマンドバッファを生成。
作成されたコマンドバッファからレンダーコマンドエンコーダーを生成。
エンコーダーに対してさまざまな設定を行う。
レンダーパイプラインステートを設定、頂点バッファを渡して、描画関数を登録。
コマンドのエンコードの完了、表示するドローアブルの登録、コマンドバッファのコミット。
実行
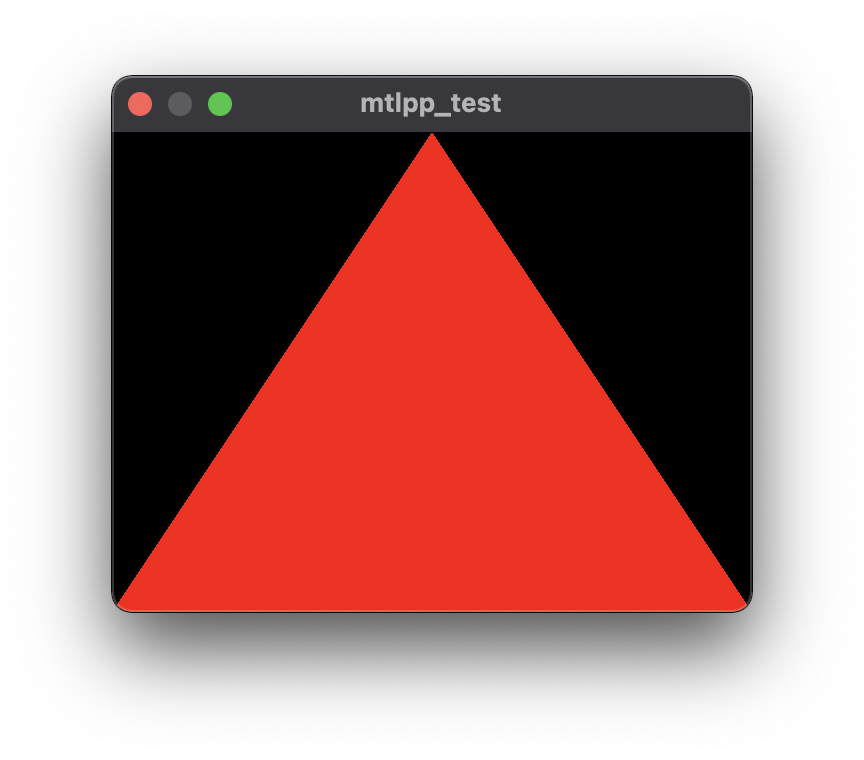
画面全体に赤の三角形が描画。
Metalのシェーダーを記述するためのファイルを追加。
Choose a template for your new file でMetal File を選択。
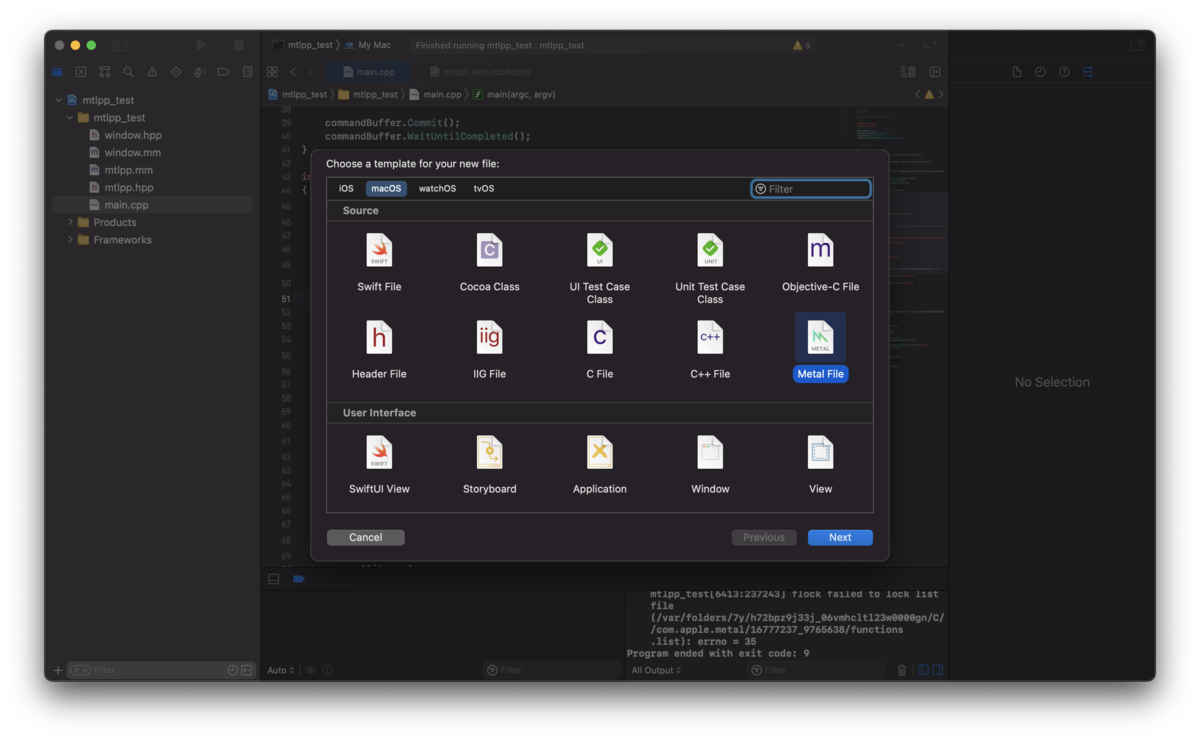
ファイル名を指定してファイルを保存する場所を選択。
プロジェクトに*.metalファイルが追加される。
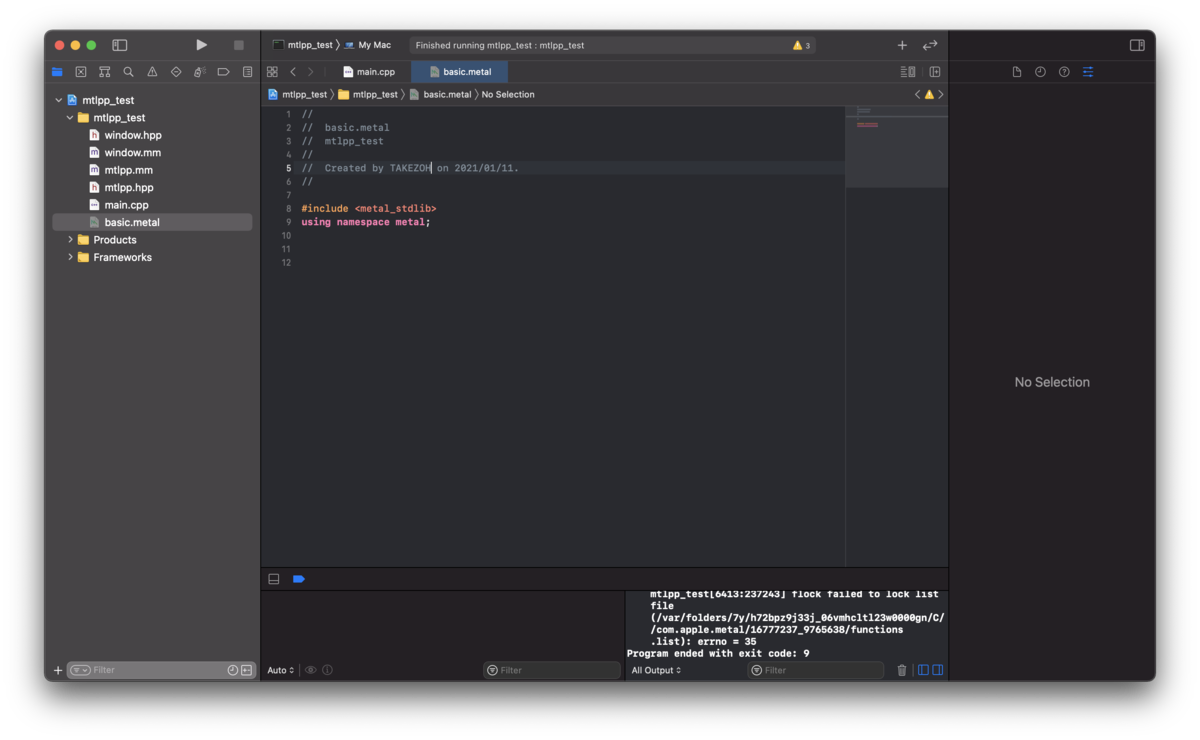
先程のシェーダーのプログラムをmetalファイルに記述する。
#include <metal_stdlib>
using namespace metal;
vertex float4 vertFunc(const device packed_float3* vertexArray [[buffer(0)]], unsigned int vID [[vertex_id]])
{
return float4(vertexArray[vID], 1.0);
}
fragment half4 fragFunc()
{
return half4(1.0, 0.0, 0.0, 1.0);
}
シェーダーの初期化
シェーダーの初期化はNewDefaultLibrary()で行う。
mtlpp::Library library = g_device.NewDefaultLibrary();
assert(library);
mtlpp::Function vertFunc = library.NewFunction("vertFunc");
assert(vertFunc);
mtlpp::Function fragFunc = library.NewFunction("fragFunc");
assert(fragFunc);
後は先ほどと同じコードで三角形が描画される。
MSL(Metal Sharding Language)の .metal ファイルをコマンドラインでビルドして .metallib を作成。
developer.apple.com
ターミナルなどから以下のコマンドを実行する。
.metalをコンパイルして中間フォーマットの .air を作成。
$ xcrun -sdk macosx metal basic.metal -c -o basic.air
.metallibをビルドする.
複数の .air をまとめてビルドすることも可能。
その際、関数名が重複してしまうとビルドエラーになってしまうので注意が必要。
$ xcrun -sdk macosx metallib basic.air basic2.air -o basic.metallib
プロジェクトファイル直下にあるリソースを読み込むためにワーキングディレクトリの設定を行う。
メインメニューの [Product] -> [Scheme] -> [Edit Scheme] の Run の Optionタブの Working Directory の Use custom working directory: にチェックを入れる。
項目に $(SRCROOT) と入力。
シェーダーの初期化
NewLibrary()でパスを指定して生成。
mtlpp::Library library = g_device.NewLibrary("shader/basic.metallib", nullptr);
assert(library);
mtlpp::Function vertFunc = library.NewFunction("vertFunc");
assert(vertFunc);
mtlpp::Function fragFunc = library.NewFunction("fragFunc");
assert(fragFunc);
他は先ほどと同じコードで三角形が描画される。
テクスチャの読み込み
MTKTextureLoaderのラッパークラス
テクスチャを適用した矩形の描画を行う。
mtlppにはテクスチャを読み込むためのAPIが用意されていない。
MetalKitのMTKTextureLoaderを使用してと外部ファイルのテクスチャを読み込めるようにする。
mtlppに倣ってMTKTextureLoaderのラッパークラスを以下のファイルで定義。
mtlpp/textureloader.hpp
mtlpp/textureloader.mm
簡易的に対応するためにパス指定で読み込めるnewTextureWithContentsOfURLを使用して実装。
#include "mtlpp.hpp"
namespace mtlpp
{
class TextureLoader : public ns::Object
{
public:
TextureLoader(const Device device);
Texture NewTextureWithPath(const ns::String& filePath, ns::Error* error = nullptr);
};
}
#import <MetalKit/MetalKit.h>
#include "mtlpp.hpp"
#include "textureloader.hpp"
namespace mtlpp
{
TextureLoader::TextureLoader(const Device device)
: ns::Object(ns::Handle{ (__bridge void*)[[MTKTextureLoader alloc] initWithDevice:(__bridge id<MTLDevice>)device.GetPtr()]})
{
}
Texture TextureLoader::NewTextureWithPath(const ns::String& filePath, ns::Error* error)
{
Validate();
NSDictionary *textureLoaderOptions =
@{
MTKTextureLoaderOptionTextureUsage : @(MTLTextureUsageShaderRead),
MTKTextureLoaderOptionTextureStorageMode : @(MTLStorageModePrivate),
MTKTextureLoaderOptionSRGB : @(NO)
};
NSString* path = (__bridge NSString*)filePath.GetPtr();
NSURL* url = [NSURL fileURLWithPath:path];
NSError* nsError = NULL;
NSError** nsErrorPtr = error ? &nsError : nullptr;
id<MTLTexture> texture;
texture = [(__bridge MTKTextureLoader*)m_ptr newTextureWithContentsOfURL:url options:textureLoaderOptions error:nsErrorPtr];
return ns::Handle{ (__bridge void*)texture };
}
}
C++側での読み込み
C++側では以下の様にしてテクスチャを読み込むことができる。
mtlpp::Texture g_texture;
func()
{
{
mtlpp::TextureLoader textureLoader(g_device);
assert(textureLoader);
mtlpp::Texture texture = textureLoader.NewTextureWithPath("data/brickwall.jpg");
assert(texture);
g_texture = texture;
}
}
テクスチャ付きの2Dの矩形の描画
シェーダー
テクスチャを描画するためのシェーダーを用意。
頂点シェーダーに渡す頂点データの定義にテクスチャ座標を追加。
フラグメントシェーダに渡す値にもテクスチャ座標を追加。
#include <metal_stdlib>
using namespace metal;
typedef struct
{
float3 position [[attribute(0)]];
float2 texCoord [[attribute(1)]];
} Vertex;
typedef struct
{
float4 position [[position]];
float2 texCoord;
} ColorInOut;
vertex ColorInOut vertFunc(Vertex in [[stage_in]])
{
ColorInOut out;
out.position = float4(in.position, 1.0);
out.texCoord = in.texCoord;
return out;
}
fragment float4 fragFunc(ColorInOut in [[stage_in]], texture2d<half> colorMap [[texture(0)]])
{
constexpr sampler colorSampler(mip_filter::linear, mag_filter::linear, min_filter::linear);
half4 colorSample = colorMap.sample(colorSampler, in.texCoord.xy);
return float4(colorSample);
}
頂点バッファの定義
{
mtlpp::VertexDescriptor desc;
auto attributes = desc.GetAttributes();
auto layouts = desc.GetLayouts();
{
auto attr = attributes[0];
attr.SetFormat(mtlpp::VertexFormat::Float3);
attr.SetOffset(0);
attr.SetBufferIndex(0);
}
{
auto attr = attributes[1];
attr.SetFormat(mtlpp::VertexFormat::Float2);
attr.SetOffset(12);
attr.SetBufferIndex(1);
}
{
auto layout = layouts[0];
layout.SetStride(20);
layout.SetStepRate(1);
layout.SetStepFunction(mtlpp::VertexStepFunction::PerVertex);
}
{
auto layout = layouts[1];
layout.SetStride(20);
layout.SetStepRate(1);
layout.SetStepFunction(mtlpp::VertexStepFunction::PerVertex);
}
g_vertexDesc = desc;
}
頂点バッファの生成
{
VertexData v[] =
{
{ {-0.5f, 0.5f, 0.0f}, {0.0f, 0.0f} },
{ {0.5f, 0.5f, 0.0f}, {1.0f, 0.0f} },
{ {-0.5f, -0.5f, 0.0f}, {0.0f, 1.0f} },
{ {0.5f, 0.5f, 0.0f}, {1.0f, 0.0f} },
{ {0.5f, -0.5f, 0.0f}, {1.0f, 1.0f} },
{ {-0.5f, -0.5f, 0.0f}, {0.0f, 1.0f} },
};
g_vertexBuffer = g_device.NewBuffer(v, sizeof(v), mtlpp::ResourceOptions::CpuCacheModeDefaultCache);
assert(g_vertexBuffer);
}
描画処理
エンコーダーで頂点シェーダーに頂点バッファをセットする際にattribute[0],[1]に対応したバッファを渡す。
フラグメントシェーダーにテクスチャを渡すためにSetFragmentTexture()で読み込んだテクスチャを渡す。
mtlpp::CommandBuffer commandBuffer = g_commandQueue.CommandBuffer();
assert(commandBuffer.GetPtr());
mtlpp::RenderPassDescriptor desc = window.GetRenderPassDescriptor();
if(desc)
{
mtlpp::RenderCommandEncoder encoder = commandBuffer.RenderCommandEncoder(desc);
assert(encoder);
encoder.SetRenderPipelineState(g_renderPipelineState);
encoder.SetFrontFacingWinding(mtlpp::Winding::Clockwise);
encoder.SetCullMode(mtlpp::CullMode::Back);
encoder.SetVertexBuffer(g_vertexBuffer, 0, 0);
encoder.SetVertexBuffer(g_vertexBuffer, 0, 1);
encoder.SetFragmentTexture(g_texture, 0);
encoder.Draw(mtlpp::PrimitiveType::Triangle, 0, 3 * 2);
encoder.EndEncoding();
commandBuffer.Present(window.GetDrawable());
}
commandBuffer.Commit();
commandBuffer.WaitUntilCompleted();
実行
画面中央にテクスチャが貼られた矩形が描画される。
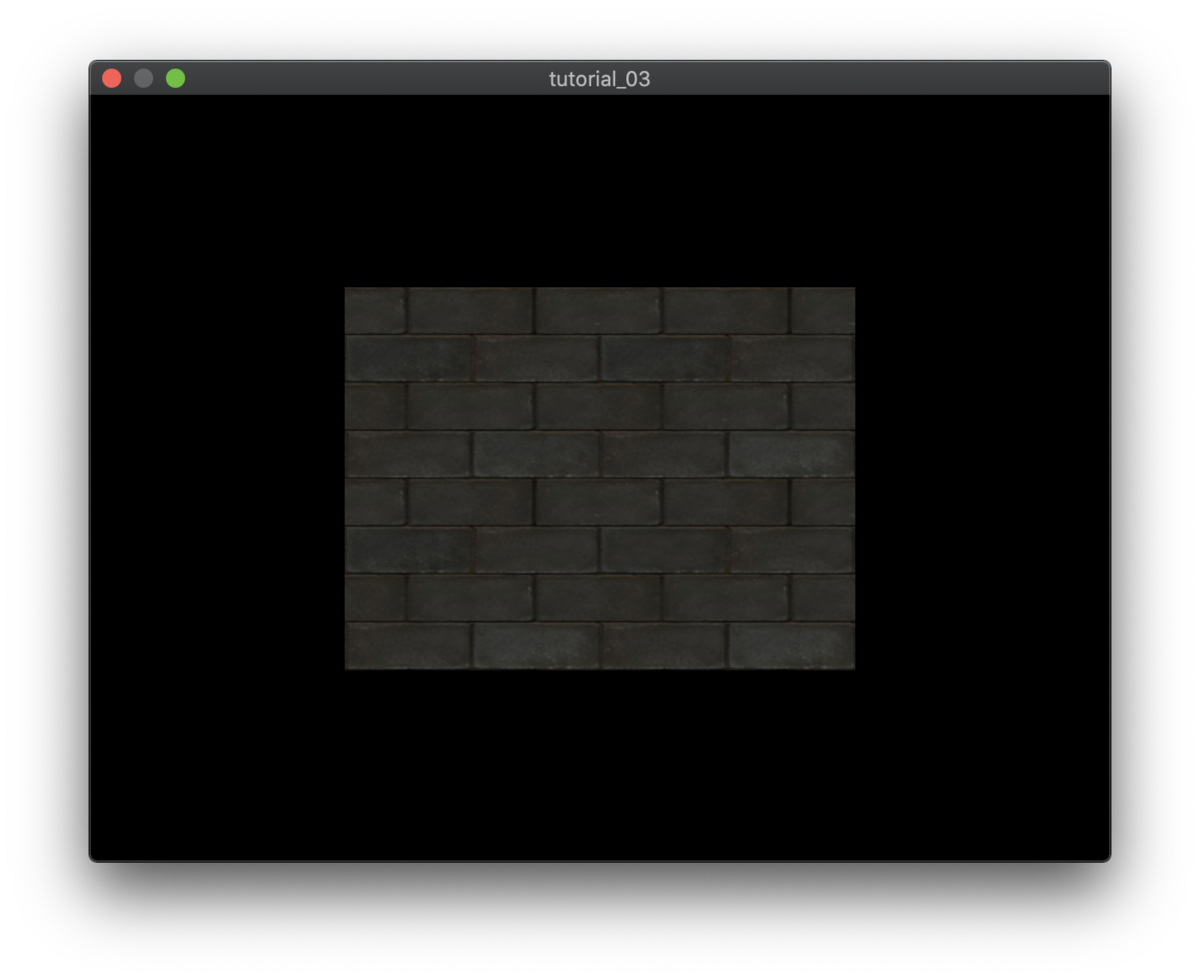
アルファブレンディングを行わないと透明にすべきピクセルが黒く描画されてしまう。
アルファブレンディングを行うことで半透明なピクセルを合成することができる。
レンダーパイプラインの生成
レンダーパイプラインの生成でアルファブレンドの設定を追加する。
{
mtlpp::RenderPipelineDescriptor desc;
desc.SetVertexFunction(vertFunc);
desc.SetFragmentFunction(fragFunc);
desc.SetVertexDescriptor(g_vertexDesc);
auto attach = desc.GetColorAttachments();
attach[0].SetPixelFormat(mtlpp::PixelFormat::BGRA8Unorm);
attach[0].SetBlendingEnabled(true);
attach[0].SetSourceRgbBlendFactor(mtlpp::BlendFactor::SourceAlpha);
attach[0].SetDestinationRgbBlendFactor(mtlpp::BlendFactor::OneMinusSourceAlpha);
attach[0].SetRgbBlendOperation(mtlpp::BlendOperation::Add);
g_renderPipelineState = g_device.NewRenderPipelineState(desc, nullptr);
assert(g_renderPipelineState);
}
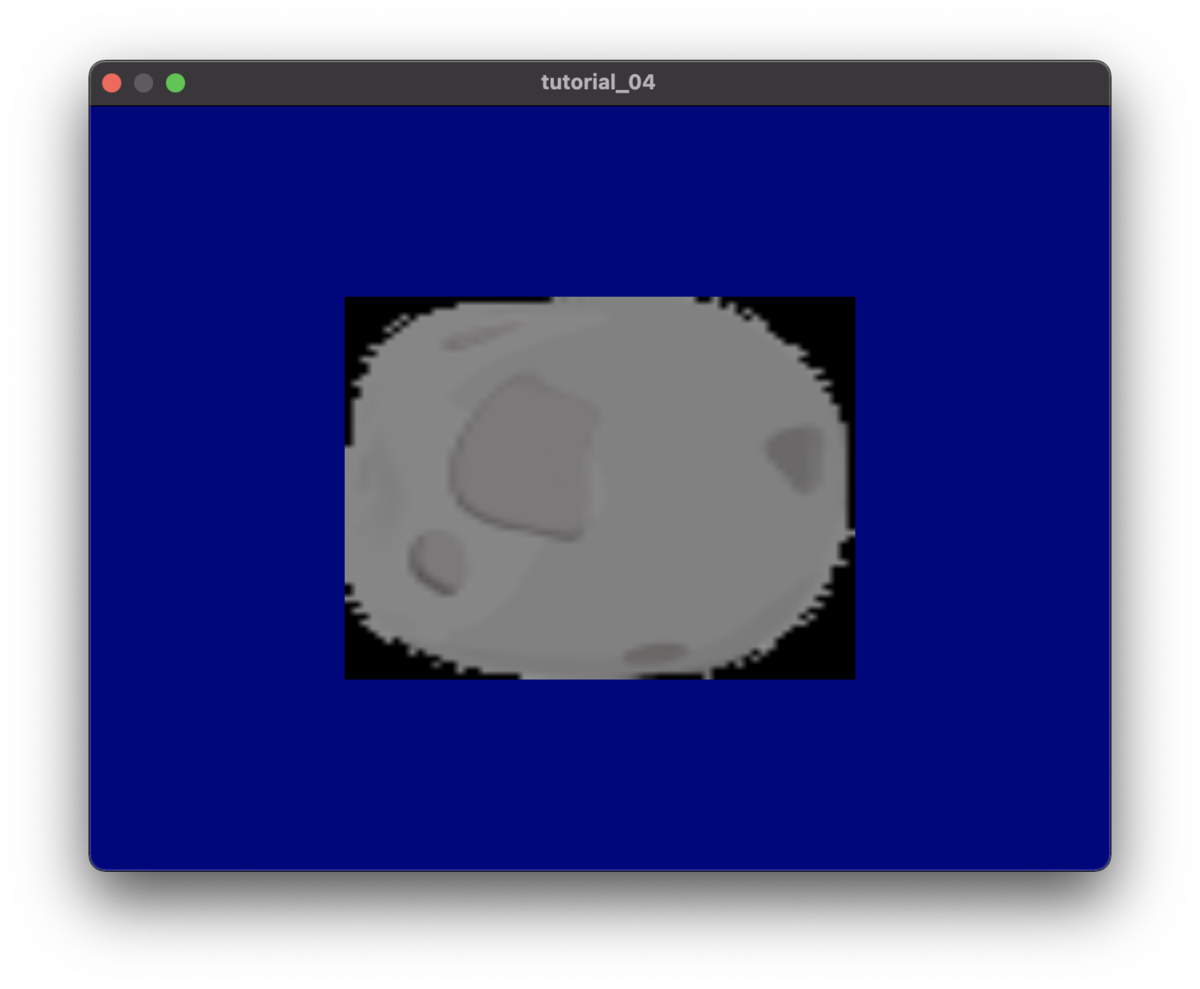
実行
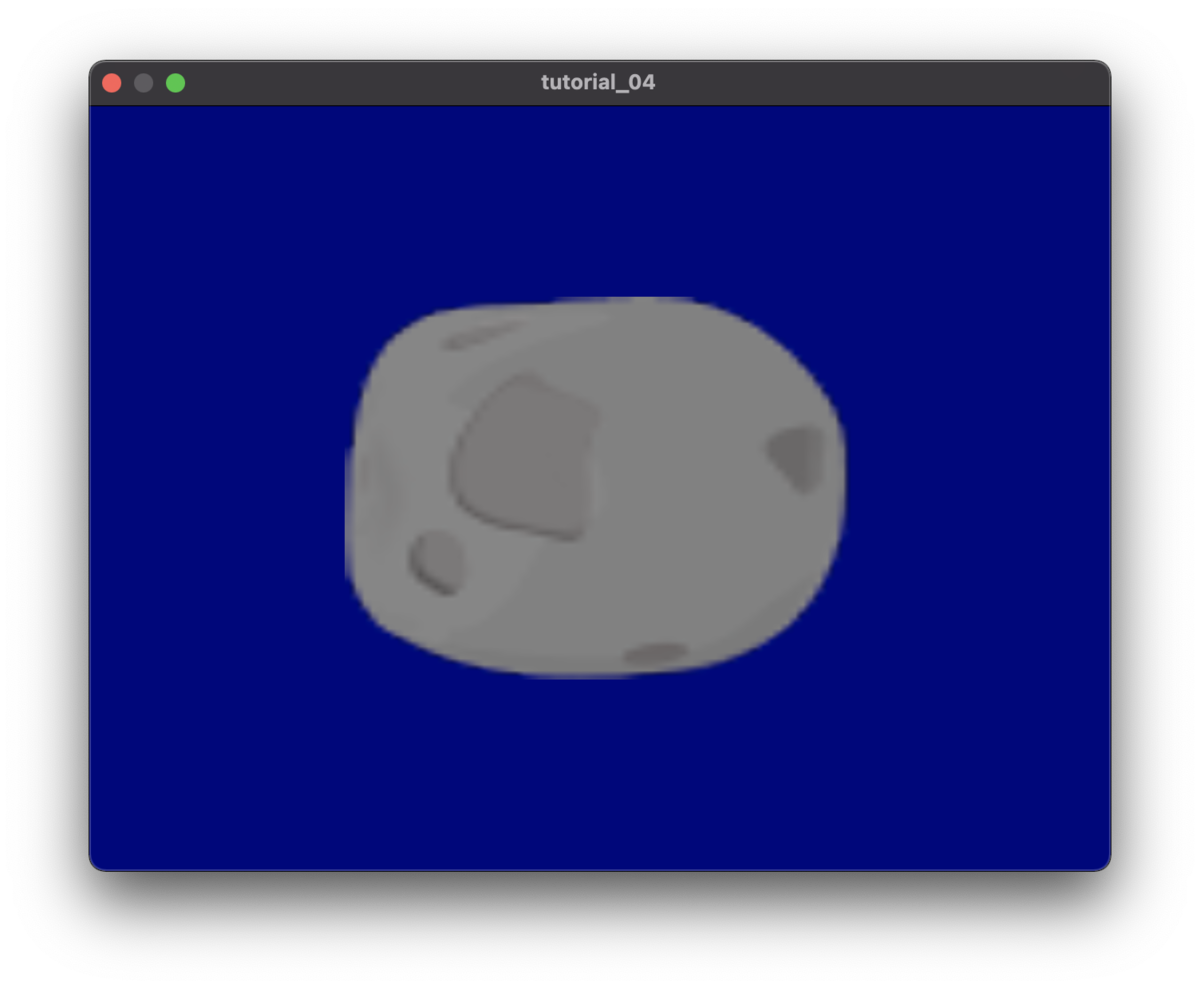
サンプラーをシェーダー関数の引数で渡すこともできる。
mtlpp::SamplerState g_samplerState;
func()
{
{
mtlpp::SamplerDescriptor desc;
desc.SetMipFilter(mtlpp::SamplerMipFilter::NotMipmapped);
desc.SetMinFilter(mtlpp::SamplerMinMagFilter::Nearest);
desc.SetMagFilter(mtlpp::SamplerMinMagFilter::Nearest);
g_samplerState = g_device.NewSamplerState(desc);
assert(g_samplerState);
}
}
mtlpp::RenderCommandEncoder encoder = commandBuffer.RenderCommandEncoder(desc);
assert(encoder);
encoder.SetRenderPipelineState(g_renderPipelineState);
:
:
encoder.SetVertexBuffer(g_vertexBuffer, 0, 0);
encoder.SetVertexBuffer(g_vertexBuffer, 0, 1);
encoder.SetFragmentTexture(g_texture, 0);
encoder.SetFragmentSamplerState(g_samplerState, 0);
encoder.DrawIndexed(mtlpp::PrimitiveType::TriangleStrip, 4, mtlpp::IndexType::UInt32, g_indexBuffer, 0);
encoder.EndEncoding();
commandBuffer.Present(window.GetDrawable());
}
シェーダー
fragment float4 fragFunc(ColorInOut in [[stage_in]], texture2d<half> colorMap [[texture(0)]], sampler colorSampler[[sampler(0)]])
{
half4 colorSample = colorMap.sample(colorSampler, in.texCoord.xy);
return float4(colorSample);
}
実行
Nearestを指定したのでLinerと異なり補間がかからずに引き伸ばされていることが確認できる。

立方体の描画
VectorやMatrix、Quaternion等の数学系の処理をとりあえず自前で用意。
commonlib/Math/以下にまとめている。
左手座標系として扱う。
window.mmの変更
デプスバッファを使用するため、window.mmのMTKViewの設定に以下を追加。
view.depthStencilPixelFormat = MTLPixelFormatDepth32Float_Stencil8;
シェーダー
ローカル座標系として処理を行う。
lambertで描画。
頂点バッファ、インデックスバッファの生成
{
VertexData vertex[] =
{
{ {-1.0f, -1.0f, -1.0f}, {0.0f, 0.0f, -1.0f}, {0.0f, 1.0f} },
{ {-1.0f, 1.0f, -1.0f}, {0.0f, 0.0f, -1.0f}, {0.0f, 0.0f} },
{ {1.0f, -1.0f, -1.0f}, {0.0f, 0.0f, -1.0f}, {1.0f, 1.0f} },
{ {1.0f, 1.0f, -1.0f}, {0.0f, 0.0f, -1.0f}, {1.0f, 0.0f} },
{ {1.0f, -1.0f, -1.0f}, {1.0f, 0.0f, 0.0f}, {0.0f, 1.0f} },
{ {1.0f, 1.0f, -1.0f}, {1.0f, 0.0f, 0.0f}, {0.0f, 0.0f} },
{ {1.0f, -1.0f, 1.0f}, {1.0f, 0.0f, 0.0f}, {1.0f, 1.0f} },
{ {1.0f, 1.0f, 1.0f}, {1.0f, 0.0f, 0.0f}, {1.0f, 0.0f} },
{ {1.0f, -1.0f, 1.0f}, {0.0f, 0.0f, 1.0f}, {0.0f, 1.0f} },
{ {1.0f, 1.0f, 1.0f}, {0.0f, 0.0f, 1.0f}, {0.0f, 0.0f} },
{ {-1.0f, -1.0f, 1.0f}, {0.0f, 0.0f, 1.0f}, {1.0f, 1.0f} },
{ {-1.0f, 1.0f, 1.0f}, {0.0f, 0.0f, 1.0f}, {1.0f, 0.0f} },
{ {-1.0f, -1.0f, 1.0f}, {-1.0f, 0.0f, 0.0f}, {0.0f, 1.0f} },
{ {-1.0f, 1.0f, 1.0f}, {-1.0f, 0.0f, 0.0f}, {0.0f, 0.0f} },
{ {-1.0f, -1.0f, -1.0f}, {-1.0f, 0.0f, 0.0f}, {1.0f, 1.0f} },
{ {-1.0f, 1.0f, -1.0f}, {-1.0f, 0.0f, 0.0f}, {1.0f, 0.0f} },
{ {-1.0f, 1.0f, -1.0f}, {0.0f, 1.0f, 0.0f}, {0.0f, 1.0f} },
{ {-1.0f, 1.0f, 1.0f}, {0.0f, 1.0f, 0.0f}, {0.0f, 0.0f} },
{ {1.0f, 1.0f, -1.0f}, {0.0f, 1.0f, 0.0f}, {1.0f, 1.0f} },
{ {1.0f, 1.0f, 1.0f}, {0.0f, 1.0f, 0.0f}, {1.0f, 0.0f} },
{ {-1.0f, -1.0f, 1.0f}, {0.0f, -1.0f, 0.0f}, {0.0f, 1.0f} },
{ {-1.0f, -1.0f, -1.0f}, {0.0f, -1.0f, 0.0f}, {0.0f, 0.0f} },
{ {1.0f, -1.0f, 1.0f}, {0.0f, -1.0f, 0.0f}, {1.0f, 1.0f} },
{ {1.0f, -1.0f, -1.0f}, {0.0f, -1.0f, 0.0f}, {1.0f, 0.0f} },
};
g_vertexBuff = g_device.NewBuffer(vertex, sizeof(vertex), mtlpp::ResourceOptions::CpuCacheModeDefaultCache);
assert(g_vertexBuff);
}
{
int32_t index[] =
{
0, 1, 2,
2, 1, 3,
4, 5, 6,
6, 5, 7,
8, 9, 10,
10, 9, 11,
12, 13, 14,
14, 13, 15,
16, 17, 18,
18, 17, 19,
20, 21, 22,
22, 21, 23,
};
g_indexBuff = g_device.NewBuffer(index, sizeof(index), mtlpp::ResourceOptions::CpuCacheModeDefaultCache);
assert(g_indexBuff);
}
レンダーパイプラインの生成
デプス、ステンシルを使用するので以下を追加。
{
mtlpp::RenderPipelineDescriptor desc;
desc.SetVertexFunction(vertFunc);
desc.SetFragmentFunction(fragFunc);
desc.SetVertexDescriptor(g_vertexDesc);
auto attach = desc.GetColorAttachments();
attach[0].SetPixelFormat(mtlpp::PixelFormat::BGRA8Unorm);
desc.SetDepthAttachmentPixelFormat(mtlpp::PixelFormat::Depth32Float_Stencil8);
desc.SetStencilAttachmentPixelFormat(mtlpp::PixelFormat::Depth32Float_Stencil8);
g_renderPipelineState = g_device.NewRenderPipelineState(desc, nullptr);
assert(g_renderPipelineState);
}
デプスステートの生成
エンコーダーでセットするDepthステートを生成。
{
mtlpp::DepthStencilDescriptor desc;
desc.SetDepthCompareFunction(mtlpp::CompareFunction::Less);
desc.SetDepthWriteEnabled(true);
g_depthState = g_device.NewDepthStencilState(desc);
assert(g_depthState);
}
ユニフォームバッファの生成
頂点シェーダーに渡すためのユニフォームバッファの生成。
typedef struct
{
Math::Matrix4 VP;
Math::Matrix4 LW;
Math::Matrix4 WVP;
Math::Matrix4 invLW;
Math::Vector3 lightDir;
Math::Vector3 cameraPos;
Math::Vector3 diffuseColor;
Math::Vector3 specularColor;
Math::Vector3 ambientColor;
float specularPower;
}UniformBuffer;
{
g_uniformBuff = g_device.NewBuffer(sizeof(UniformBuffer), mtlpp::ResourceOptions::StorageModeShared);
assert(g_uniformBuff);
}
描画
カメラのプロジェクションとビューマトリクスの計算。
Math::Matrix4 projection;
Math::Matrix4 view;
{
float fovY = Math::ToRadians(60.0f);
float width = static_cast<float>(SCREEN_WIDTH);
float height = static_cast<float>(SCREEN_HEIGHT);
float near = 1.0f;
float far = 10000.0f;
projection = Math::Matrix4::CreatePerspectiveFOV(fovY, width, height, near, far);
}
{
Math::Vector3 cameraPos = Math::Vector3(0.0f, 0.0f, -4.0f);
Math::Vector3 target = cameraPos + Math::Vector3::UnitZ() * 1.0f;
Math::Vector3 up = Math::Vector3::UnitY();
view = Math::Matrix4::CreateLookAt(cameraPos, target, up);
}
モデルのワールドマトリクの計算。
{
float angle = -1.0f * deltaTime;
Math::Quaternion incY(Math::Vector3::UnitY(), angle * 0.5f);
Math::Quaternion incX(Math::Vector3::UnitX(), angle * 0.2f);
auto rot = g_transform.GetRotation();
rot = Math::Quaternion::Concatenate(rot, incY);
rot = Math::Quaternion::Concatenate(rot, incX);
g_transform.SetRotation(rot);
}
計算したプロジェクション、ビューマトリクスやモデルのマトリクスを頂点シェーダーに渡すユニフォームバッファにセットする。
{
UniformBuffer* buffer = static_cast<UniformBuffer*>(g_uniformBuff.GetContents());
buffer->VP = view * projection;
buffer->LW = g_transform.GetWorldMatrix();
buffer->invLW = buffer->LW;
buffer->invLW.Invert();
buffer->WVP = g_transform.GetWorldMatrix() * view * projection;
{
auto lightDir = Math::Vector3::Normalize(Math::Vector3(0.0f, -0.7f, 0.7f));
auto invLW = buffer->invLW;
buffer->lightDir = Math::Vector3::Transform(lightDir, invLW, 0.0f);
}
{
buffer->ambientColor = Math::Vector3(0.4f, 0.4f, 0.4f);
buffer->diffuseColor = Math::Vector3(1.0f, 1.0f, 1.0f);
buffer->specularColor = Math::Vector3(0.6f, 0.6f, 0.6f);
}
}
エンコーダーに対してデプスステートをセットを追加。
ユニフォームバッファのセットを追加。
mtlpp::CommandBuffer commandBuffer = g_commandQueue.CommandBuffer();
assert(commandBuffer);
mtlpp::RenderPassDescriptor desc = window.GetRenderPassDescriptor();
if(desc)
{
mtlpp::RenderCommandEncoder encoder = commandBuffer.RenderCommandEncoder(desc);
assert(encoder);
encoder.SetRenderPipelineState(g_renderPipelineState);
encoder.SetDepthStencilState(g_depthState);
encoder.SetFrontFacingWinding(mtlpp::Winding::Clockwise);
encoder.SetCullMode(mtlpp::CullMode::Back);
{
encoder.SetVertexBuffer(g_uniformBuff, 0, 3);
encoder.SetVertexBuffer(g_vertexBuff, 0, 0);
encoder.SetVertexBuffer(g_vertexBuff, 0, 1);
encoder.SetVertexBuffer(g_vertexBuff, 0, 2);
encoder.SetFragmentTexture(g_texture, 0);
encoder.DrawIndexed(mtlpp::PrimitiveType::Triangle, 36, mtlpp::IndexType::UInt32, g_indexBuff, 0);
}
encoder.EndEncoding();
commandBuffer.Present(window.GetDrawable());
}
commandBuffer.Commit();
commandBuffer.WaitUntilCompleted();
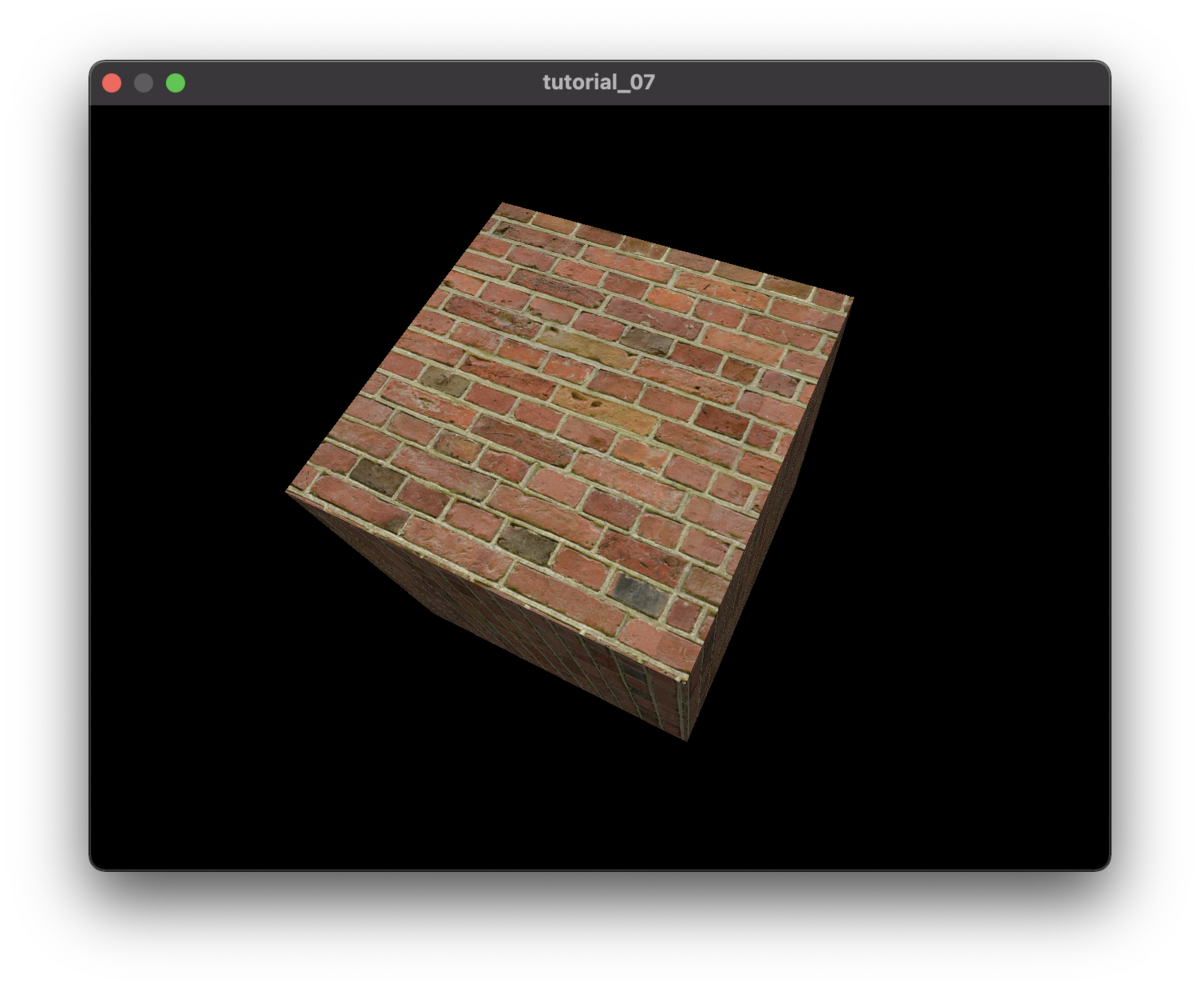
実行
参考
booth.pm
フリー素材リンク
texturehaven.com

![[改訂第3版]Jenkins実践入門 ――ビルド・テスト・デプロイを自動化する技術 WEB+DB PRESS plus](https://m.media-amazon.com/images/I/51RJPWr1wfL._SL500_.jpg "[改訂第3版]Jenkins実践入門 ――ビルド・テスト・デプロイを自動化する技術 WEB+DB PRESS plus")